Salesforce Web-To-Lead Forms — Can You Do Better?
Updated on May 15, 2024
When it comes to SaaS, there is no bigger name than Salesforce in the industry. It has been at the pinnacle of the MarTech world for quite a long time. With all the features, capabilities, and conveniences on offer, it is no surprise that they have remained on top for so long.
One of those features is the web-to-lead form, which allows you to collect leads from your website and inject them into your Salesforce CRM. However, this has some limitations.
In this article, we will discuss the web-to-lead form, how you can set it up, the benefits you will gain, and most importantly, how you can work around some of its limitations.
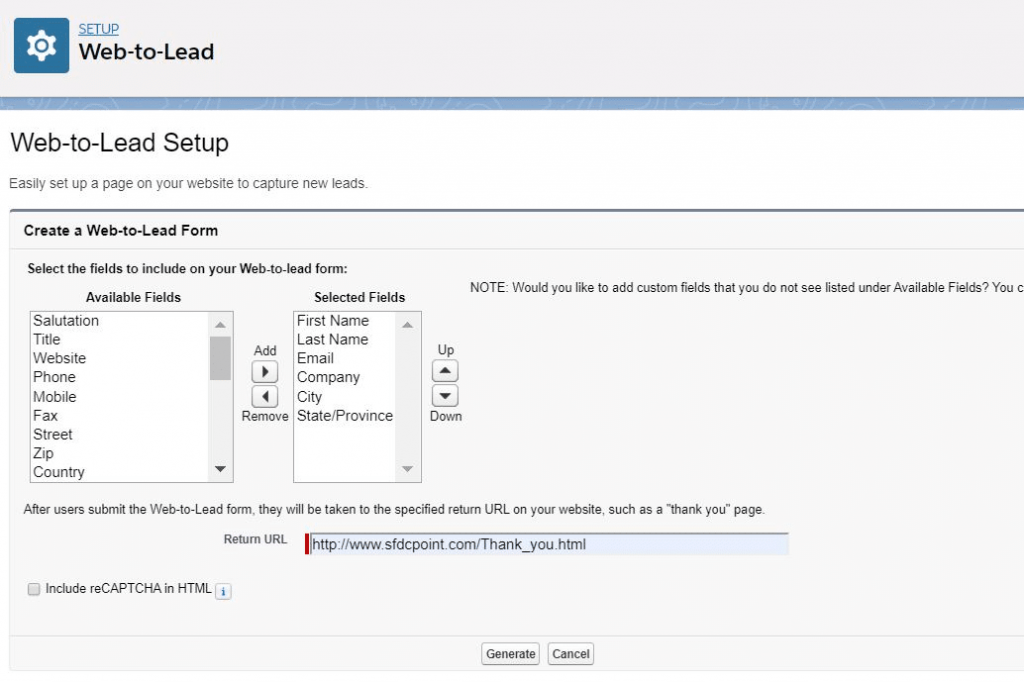
Source: SFDC Point
What is Web to Lead in Salesforce?
Salesforce Web to Lead feature helps businesses capture leads directly from their website. These captured leads are then automatically transferred to Salesforce’s CRM (customer relationship management) system.
It involves generating a custom HTML form that can be embedded in a website. When a visitor fills out the form with their details and submits it, the data is sent directly to Salesforce CRM, thus creating a new lead record.
This Salesforce feature streamlines workflow automation, eliminating the need for manual data entry within the CRM and allowing businesses to save time and resources.
Feature Overview of the Salesforce Web-To-Lead Form
1. Customizable Form Fields
Every business has different objectives and requirements. Different designs, different fields are often required based on your strategy. Shorter forms for more leads, longer forms for more qualified leads, for example.
Thus, businesses need to create forms tailored to their specific needs. They can add custom form fields to capture the information they require from potential leads. The ability to customize forms is a must-have feature for any web form tool.
2. Automatic Lead Creation
Manual data entry, CSV uploads, and lead creation will hold you back and waste resources. With Salesforce web-to-lead, you don’t have to worry about any of it.
With this feature, all it takes is for a visitor to fill out a web-to-lead form on your website. As soon as he submits the form, the data is directly fed into the Salesforce CRM, and a new lead is created. Thus, your business benefits by leveraging an automated workflow.
3. Integration with Salesforce Workflows and Automation
It is safe to say that many things work like magic with Salesforce. We have their workflow and automation capabilities to thank for that. You should be thrilled that you can access all of these when using Salesforce web-to-lead.
The possibilities are endless. You can automatically route a lead to the appropriate sales team or add it to a specific marketing campaign. Conversely, you can set up an automated workflow that will follow up with every new lead as per instructions.
4. Tracking and Reporting
Salesforce’s tracking and reporting capabilities enable you to monitor the success of your web-to-lead forms. Based on the insights generated, you can optimize your forms or lead capture mechanism and attain the desired level of performance.
Having analytical data for your lead acquisition sources within your CRM makes for a seamless experience.
Advanced Analytics
Salesforce’s web-to-lead forms, while primarily designed for lead capture, can indirectly help with advanced analytics in the following ways:
Data Uniformity: Since the data captured is directly fed into the Salesforce CRM, it ensures a uniform structure, which is crucial for advanced analytics. Inconsistent data can cause problems during analysis.The form ensures a uniform structure by capturing data directly into the Salesforce CRM, which is crucial for advanced analytics.
Real-time Data Collection: The feature allows real-time data collection, which means that your analytics are always based on the most recent and relevant data, improving the accuracy of your predictions and insights.
Customer Journey Mapping: Capturing the initial point of contact with a lead can help you map the customer journey from the beginning. This data can feed into advanced analytics to understand patterns, trends, and behaviors of your leads from the initial point of interaction.
Segmentation: The data collected can be used to segment customers based on various attributes like source, location, etc. This can further feed into advanced analytics, allowing for more personalized marketing efforts and improved customer experience.
How To Start Using Salesforce Web-To-Lead Forms
To begin using Salesforce web-to-lead forms, you must first enable field history tracking.
This involves four steps: setting up your lead form, creating the web-to-lead form, testing the integration, and configuring field history tracking reports. Let’s check out the details!
Setting Up the Web-To-Lead Form
Follow these steps —
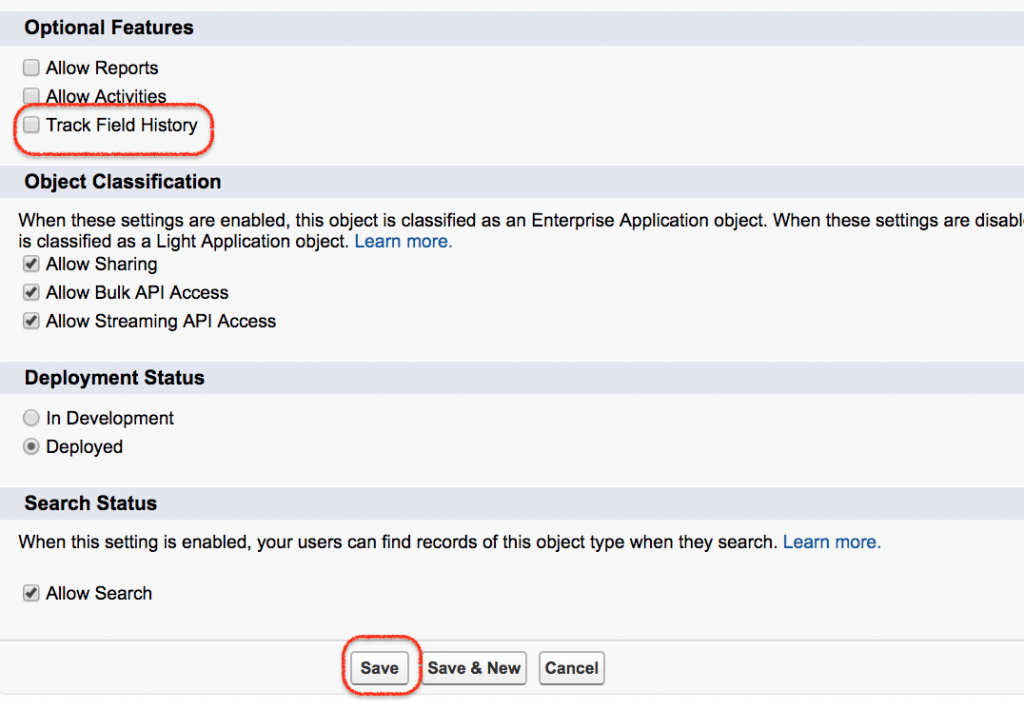
Image Source: Tutorial Kart
- Log in to Salesforce with your credentials.
- Click the icon for Setup at the top right corner of the screen.
- In the Setup menu, type “Object Manager” in the Quick Find box and select “Object Manager.”
- From the list of objects, find and click “Lead.”
- In the Lead Object settings, find and click on “Fields & Relationships.”
- Click on “Set History Tracking” located at the top right corner of the Fields & Relationships page.
- Select the fields you want to track by checking the boxes next to the field names.
- Click “Save.”
You must also add a hidden field with the lead record’s Salesforce ID. This will help Salesforce determine which lead record needs to be updated once the form is submitted.
Creating the Web-To-Lead Form
You can use this step-by-step guide for creating and enabling web-to-lead forms in Salesforce —
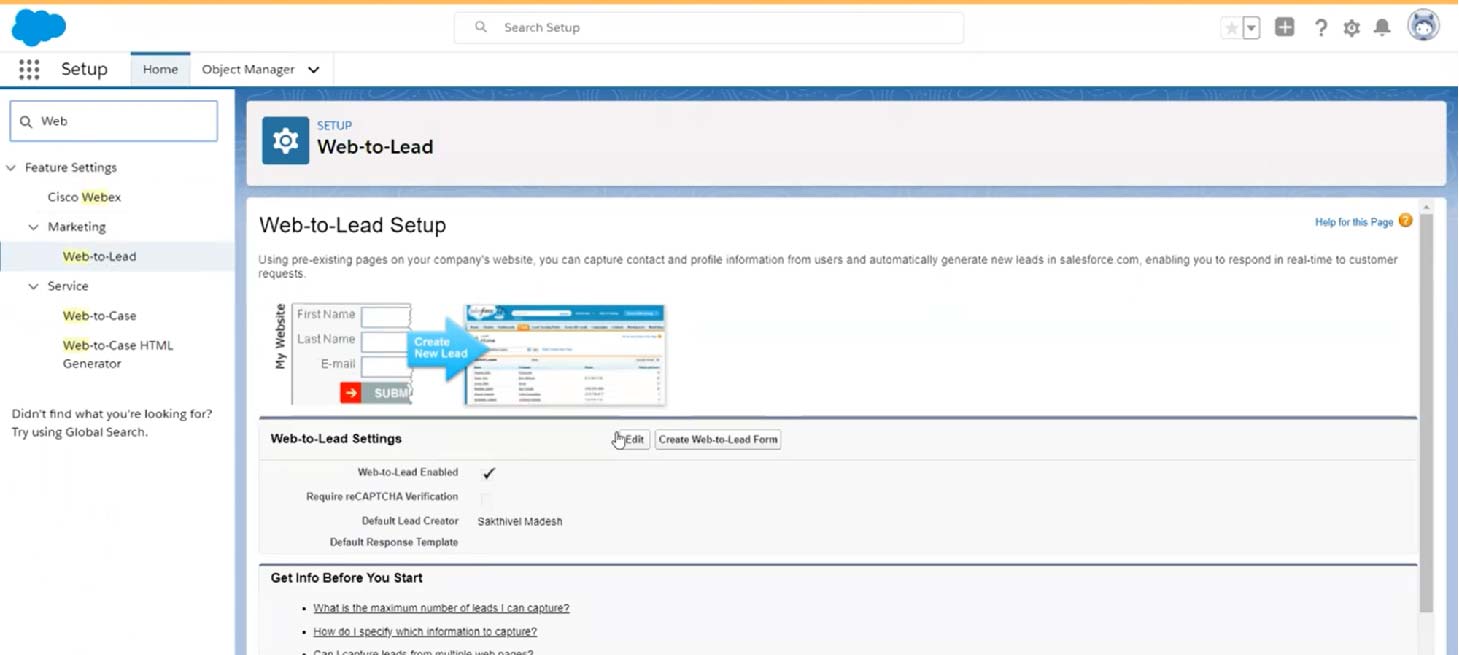
The first step in the process of creating a web-to-lead form is to navigate to the Web-to-Lead menu. From your Home menu, click on the Search Bar on the top left side and type Web to Lead.
Following that, click on the Web-to-Lead option under the Marketing Menu. This will open the Web-to-Lead setup page.
2. Create a New Web-to-Lead Form
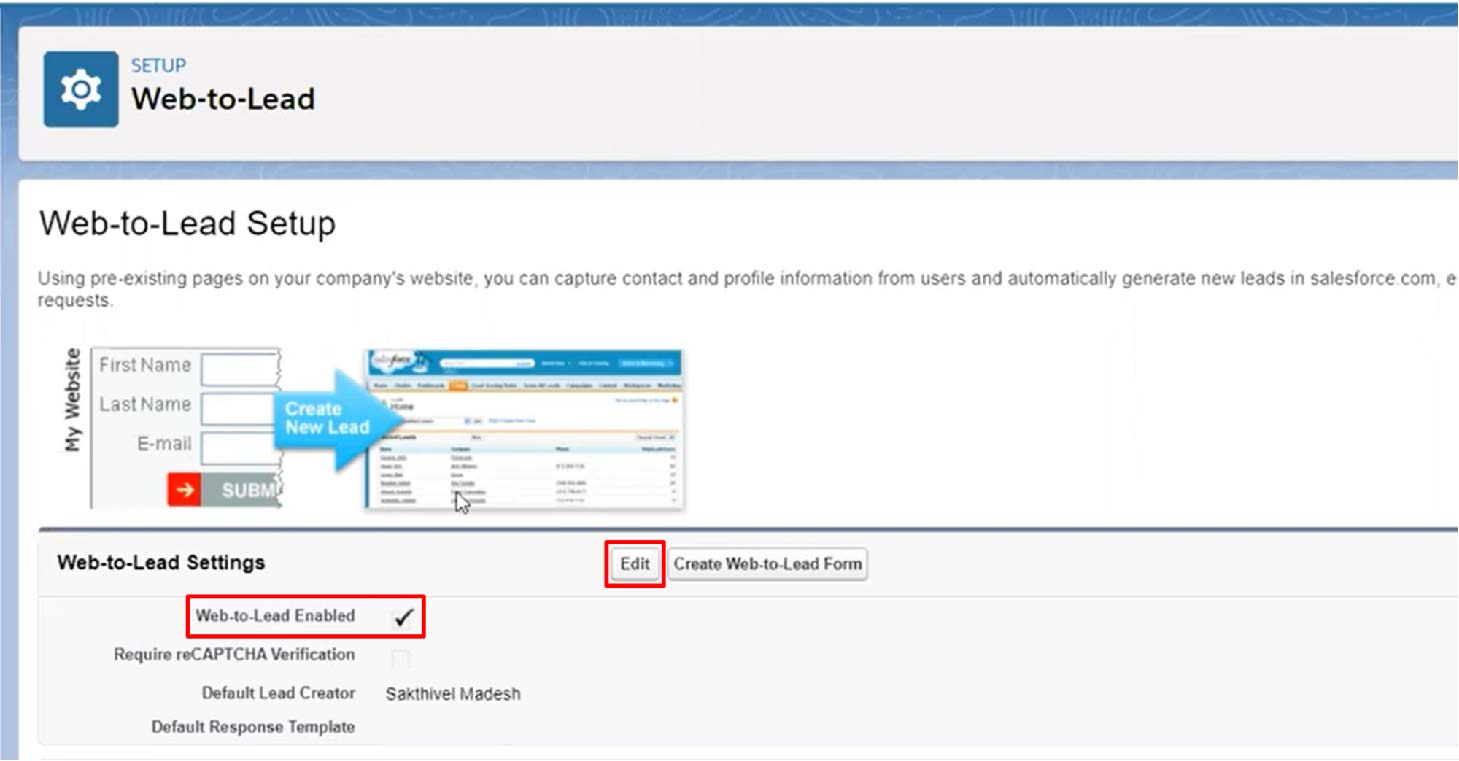
In the Web-to-Lead setup menu, check if the Web-to-Lead feature is enabled. If not, Click on the Edit button and Enable it.
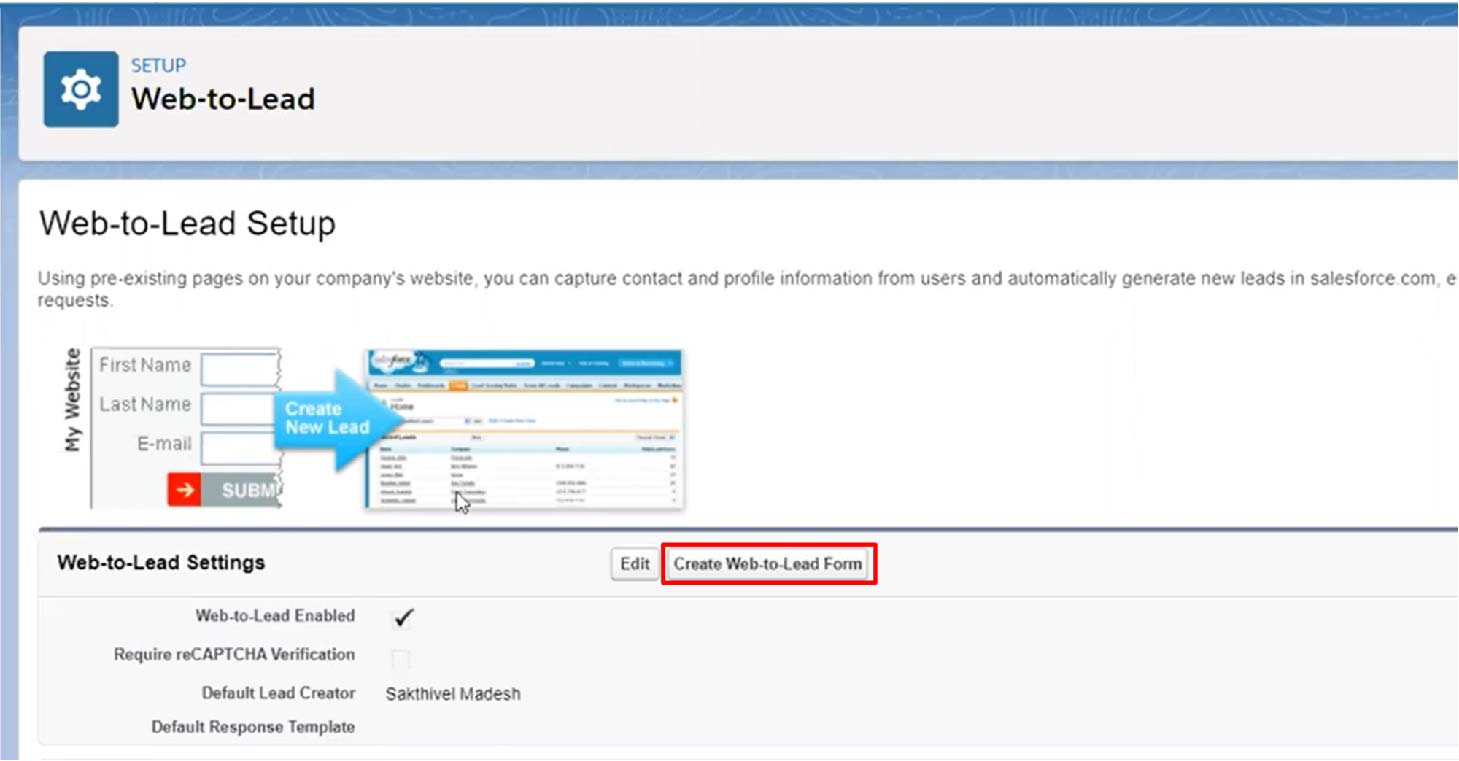
Once enabled, you can click on the Create Web-to-Lead Form button. This will open up the Web-toLead Form Builder menu.
3. Customize The Web-to-Lead Form
The next step requires you to customize the form to fit the requirements of your lead generation campaign. You have a list of available data fields from which to choose. Note that a few data fields are selected as default.
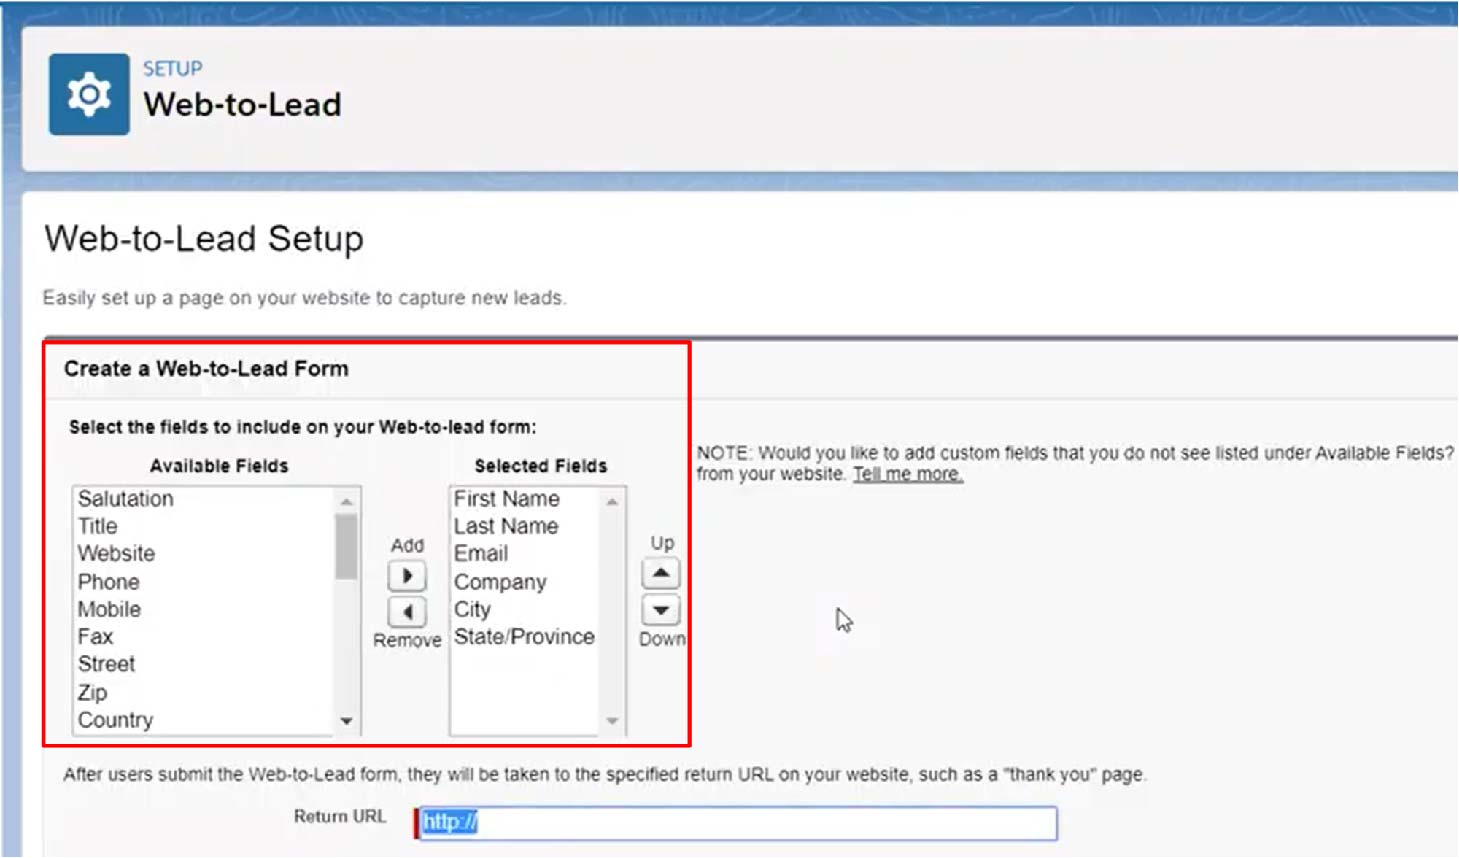
You can change these fields according to your needs and add any data fields for which you wish to collect lead information. You even have the option to add a custom data field.
4. Fill in the Other Required Fields
In some cases, you need to fill out some additional fields before you can generate the web-to-lead form. These fields include options such as the Return URL, include reCAPTCHA, Enable server failback, and Default language.
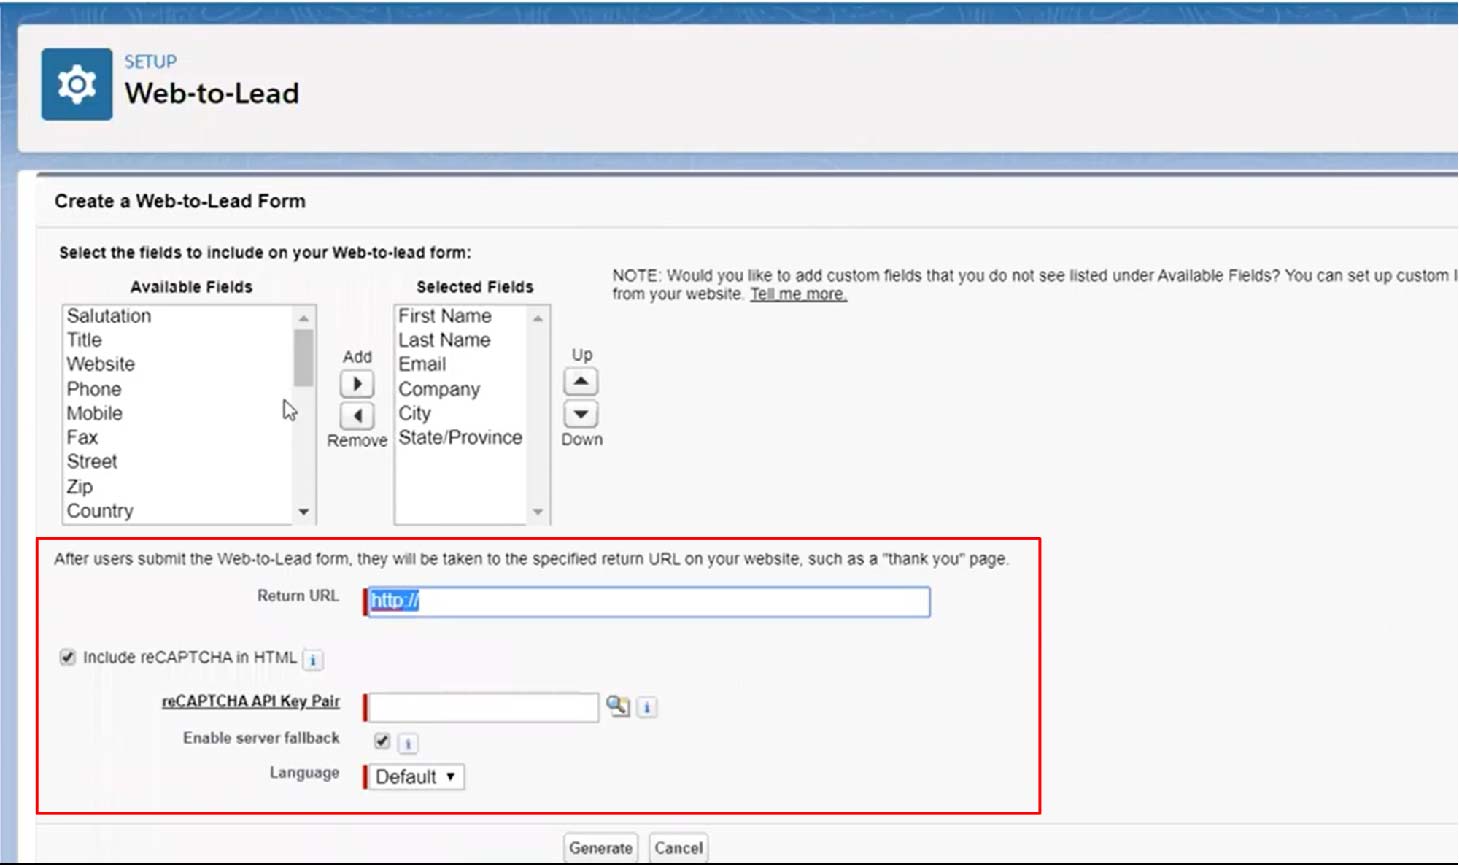
These additional options let you further tailor a customer’s experience furthermore. The reCAPTCHA option helps eliminate spam entries in the web form.
5. Generate and Deploy the HTML code
Once you have customized the form, click on the “Generate” button at the bottom of the page. This will generate the HTML code for your web-to-lead form.
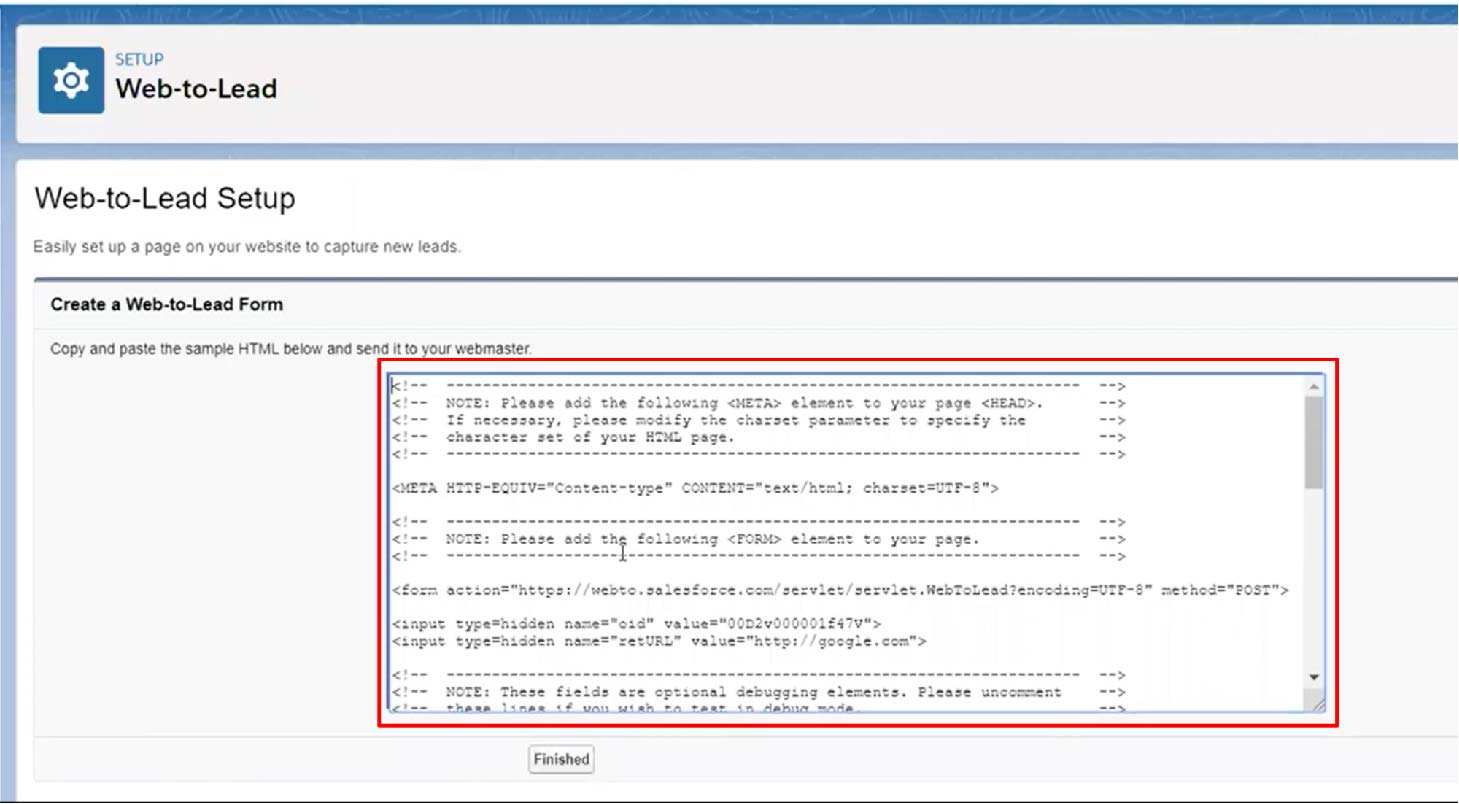
Following the generation of the HTML code, copy the code and paste it into the HTML of the website page where you want the form to appear. Save the changes to the website page and test the form to ensure that it is working correctly.
Testing the Integration of the Web Form with Salesforce
Follow these steps —
- Use your web-to-lead form to submit a test lead to ensure it’s working correctly.
- Go to the Leads tab and open the newly created lead record.
- Scroll down to the “Lead History” related list to verify that changes to the tracked fields are being recorded.
Configure Field History Tracking Reports
Follow these steps —
- In the Setup menu, type “Reports” in the Quick Find box and select “Reports.”
- Click “New Report” and select “Leads with History” from the report types.
- Customize the report to include the fields you need to track changes over time.
- Save and run the report to monitor field changes.
Note: Remember that Salesforce has a limit on the number of fields you can track per object (usually 20 fields). You must also ensure that users who need to view the field history have the appropriate permissions.
What Data Do Salesforce Web-To-Lead Forms Collect?
Many types of data can be collected using Salesforce web-to-lead forms, depending on the fields that are filled out.
Salesforce web-to-lead forms automatically record the following information:
Standard Lead Fields
- Contact Information: This includes first and last names, email ID, phone numbers, etc.
- Company Information: This may include the company name, job title, website link.
- Address Details: This may include street name, city name, state or province, ZIP code, name of country, etc.
- Additional Information: This may include lead source (how the lead found out about your company), industry, number of employees, annual revenue, and more.
Custom Lead Fields
This includes custom fields that you may have created in your Salesforce Lead object to capture specific information relevant to your business. These could include fields like “Product Interest,” “Preferred Contact Method,” “Referral Source,” and more.
This primarily includes campaign information, often passed as hidden fields to associate the lead with a specific campaign automatically.
Optional Information
- Comments or Questions: This includes a text area where users can type additional information or questions they may have.
- Opt-In or Opt-Out Preferences: This includes checkboxes for newsletter sign-up, consent to be contacted, etc.
Each piece of information is automatically saved in Salesforce once they submit a web-to-lead form. You can use this data to track leads, qualify them, and convert them into sales.
The Drawbacks of Web-To-Lead Forms
Okay, it is now time to get into the drawbacks and limitations of Salesforce’s web-to-lead forms. Yes, while Salesforce web-to-lead is a powerful feature, it is not perfect.
Here are a few common drawbacks to web-to-lead forms:
1. Limited Lead Tracking
Web-to-lead forms in Salesforce can only capture basic lead information such as name, email address, and phone number. This used to be enough in the earlier days.
However, information such as lead behavior, interest, and intent have become important today. Businesses can opt for a more targeted and personalized marketing approach using these insights. While you can get some of these benefits using Salesforce’s marketing offerings, that would significantly add to your costs.`
2. Incomplete Lead Data
There is always a risk of the visitor not filling out the complete form or filling it out inaccurately.
This could spell problems as it degrades the quality of your pool of leads, especially those that may need additional information to be qualified.
3. Lack of freedom to use third-party form providers
Salesforce is a veteran in the marketing tech world which means a lot of its platform components are outdated in terms of UX.
You may require continuous assistance from a Salesforce expert to set up and manage everything for your business at all times.
4. Limited Integration Options
Salesforce’s web-to-lead feature is specific to the Salesforce platform. This is great news if your business already uses Salesforce.
However, this also means you’re limited to Salesforce’s native integrations. This can be a problem if you don’t use Salesforce extensively and have other specialized marketing tools in your tech stack.
How can Salespanel get better Lead Data to Salesforce?
Salespanel is a website intelligence software that can capture leads from any javascript form on your website. This could be the web-to-lead form or any other third-party forms (Mailchimp, Typeform, Jotform, you name it). Absolutely no integration is required!
For every lead that is captured, Salespanel tracks its activities both before and after the acquisition and tracks the entire customer in real time. These leads can be synced to your Salesforce CRM directly or segmented or scored first before they are sent. Salespanel natively integrates with Salesforce, which makes all of these a total breeze without you getting stuck with Salesforce’s forms or paying extra for premium marketing features (scoring, etc.)
This process takes place quickly, which means your sales team can promptly follow up with leads, drastically improving the chances for a conversion. Moreover, all of this collected data is of tremendous help for accurate marketing attribution.
Contact us to learn more!
Conclusion
The web-to-lead form feature from Salesforce serves as a formidable tool for businesses looking to streamline their lead generation process, offering customizable form fields, automatic lead creation, integration with Salesforce workflows, and tracking and reporting capabilities. The leads captured through these forms are seamlessly transferred to your CRM.
However, it does have some limitations that can cause problems with lead data collection, tracking, and usage. If you want to use third-party forms, live chat, helpdesk, etc., without any hesitation and want to retain tracking capabilities, leverage a tool like Salespanel.
Sell more, understand your customers’ journey for free!
Sales and Marketing teams spend millions of dollars to bring visitors to your website. But do you track your customer’s journey? Do you know who buys and why?
Around 8% of your website traffic will sign up on your lead forms. What happens to the other 92% of your traffic? Can you identify your visiting accounts? Can you engage and retarget your qualified visitors even if they are not identified?


